Showing posts with label projects. Show all posts
Showing posts with label projects. Show all posts
The Ripple Effect
4.26.2011
So a while ago I started making a little blankie for my niece. She turned TWO earlier this month, and I just finally got it sent out a little while ago. A little late, but it was made with lots of time and love. I think it's adorable. And from what I know she likes the color purple. :) She has a purple big girl room, and she even told me I should name my baby girl purple. Ha ha! I love her.


Handmade Baby Goodies!
3.21.2011
A very special friend of mine is due to have a baby girl any day now. I just had to make some goodies for the little beauty that's about to be born - baby things are so fun to make! I crocheted a baby beanie and a few washcloths, and I also sewed up a receiving blanket (that wasn't in my original plans, but when I saw the bright, beautiful fabric at Happy Quilt, I just couldn't resist!).


Materials
And here are the few other goodies I made for her. A few washcloths, and an adorable beanie. I just love that flower on there!


Materials
- 2 yards of flannel material. I used 1 yard of print, and 1 yard of solid white. You can use whatever you want.
- Coordinating thread.
- Wash and dry the fabric. Iron if necessary.
- Place one piece of flannel right side up, and lay the second piece of flannel on top of the first, right side down.
- Pin the layers together, every inch or so, the whole way around.
- Being sewing in the middle of one side. Do not start at a corner. Using a straight stitch and a 1/4-inch seam allowance, sew all the way around the blanket, but leave about a 6-inch hole in the side where you started, or big enough to put your hand through.
- Turn the blanket right side out. Use your fingers to poke the corners into points. Smooth out blanket edges so they're smooth, or press them flat with an iron.
- Pin the 6-inch hole together so the edges stay tucked inside while you finish the blanket.
- Then, sew around the edge of the blanket a second time. Do not start on the side where you have the hole pinned shut. Start anywhere else except there.
- Use a very small seam allowance when sewing the second time. 1/8-inch, if possible. Sew the whole way around the blanket, and back stitch a the beginning and end.
And here are the few other goodies I made for her. A few washcloths, and an adorable beanie. I just love that flower on there!


I had so much fun making all of these things... I hope she enjoys them! :)


Nursery: No-Sew Custom Crib Skirt
3.19.2011
So I decided to make our baby girl's crib skirt out of the same material I used for the curtains. And I think it turned out very nicely!
I followed a tutorial I found at an awesome website called Young House Love. I won't waste my time writing it out for you -- you can just go check out that tutorial yourself if you're interested. Actually you should just go check out that website anyways, it's awesome! And I totally want their living room. Just sayin'.
The material for the curtains & crib skirt only cost me about $18. I used 2 rolls of heavy duty hem tape, which cost about $1.50 per roll, and a little bit of velcro. So all in all, I spent roughly $21.00. I'm pretty sure I saved us some money! Wahoo! Not only that, but I think they look 100x better than anything I could just go out and buy, because I was able to make them exactly how I wanted them (I didn't really want anything with animals all over it, and I didn't see anything else that caught my eye). I think that deserves an iced white chocolate mocha from Starbucks... right? I thought so too.
Here are a couple photos. One is without the flash, and one is with the flash.. because, once again, the lighting in there just awesome. Not.


The crib sheet is actually a really light pink, if you can't tell from the photos. It's from Target, and it's so soft... I need to get a few more! The crib is coming along nicely, I think! The nursery is definitely starting to look like a nursery. :)

A BIG Crochet Project...
3.15.2011
... but not much time to do it! I'm working on something for our beautiful little niece who is about to turn TWO!


I have a long ways to go on this thing... but I'm confident that I'll have it done (err, or at least most of it) by my deadline. Can't wait to see how it turns out!
Nursery: Easy No-Sew Curtains
3.13.2011
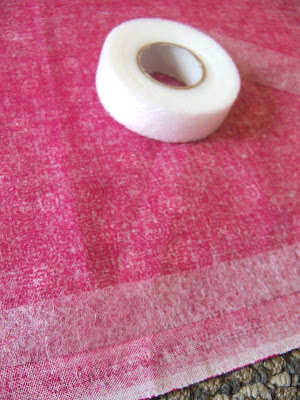
This past weekend I was able to get the curtains finished for our baby girls' nursery. I love these curtains because they are so simple! Anyone can do them (as long as you know how to use an iron... which I hope you do). Making them is so much more fun than just going out and buying curtains, imo, because you get to pick out exactly what you want.
For these, all I needed was a fabric of my choice (after I measured my window for exactly what I needed, adding on 1 inch on the top and bottom for the hem), scissors, iron on hem tape, and an iron. Totally simple, right? Hem all the way around your fabric, and wah-la, you have curtains!


For these, all I needed was a fabric of my choice (after I measured my window for exactly what I needed, adding on 1 inch on the top and bottom for the hem), scissors, iron on hem tape, and an iron. Totally simple, right? Hem all the way around your fabric, and wah-la, you have curtains!


I chose this beautiful deep pink fabric and it compliments the light blue walls SO well! The fabric is light and breezy - I wasn't concerned about them being thick and room darkening because this particular room in our apartment gets practically no natural light because it's in the very corner of the building (it doesn't help that it was cloudy out when I took these photos!). Which is why some of the pictures are so off.. sorry about that.. hard to take a good picture with my camera without any natural light! My flash made the blue walls look a little more of a bright blue than they actually are.


I used 2 packs of clip-on curtain rings to hold the curtain to the rod, and it gives the curtains that folded effect at the top, which I love. And they're long and flowy.
Again, these are SO EASY. Absolutely anyone can do this. In fact, I may even whip some up for the master bedroom. :) Next up on my nursery to-do list is the crib skirt. It's going to be another no-sew project!
EDIT: Wanted to add a better picture of the wall/curtain color combo. While the quality is still eh, this picture gives you a better idea of the actual colors. :)

Project: Command Center Organization, Pt. 3 (FINISHED!)
3.01.2011
Finally finished with my "home office" organization. I feel great now that it's done, and I'm much happier every time I sit down to do grocery lists, budgeting, go through the mail, etc. Check out my before and after pictures...


Much better, right? Right. I even have a before and after of the drawer... a lot easier to find things..


So, first I went through all of our papers (financial documents, etc, etc) and made a pile of things to shred and then sorted the rest and put them in their respective hanging file folders (here).
Second, I found a way to organize everything on top of the desk. A little storage box worked really well for me. I also bought a couple $1 jars to put in tacks and paperclips. (here).
Finally, I organized the drawer, cleaned up the rest of the clutter on the hutch and added a few new touches for now (like a few pictures that really make me smile). Oh yeah, I also added my little coupon book.. helps me keep them organized when I go shopping!


I feel like I can breathe a little bit better now that this is done. And I don't cringe every time I pass this area - always a plus. How does everyone else keep their 'home office' space or papers and such in order?
Project: Command Center Organization, Pt. 2
2.25.2011
I like calling it a 'command center'. It makes my little office area sound really important. So, from the last post, the first thing I did was go through all of our documents and sort what needs to be shredded and then put the rest of the papers in their respective file folders... ta-da..

I love the that the folders are so colorful and pretty.. it makes me happy.
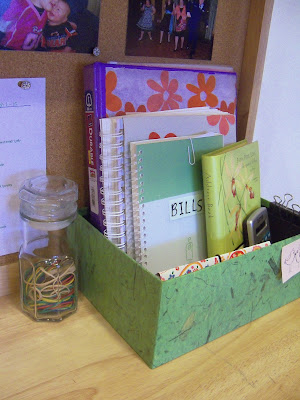
The next day it was time for me to organize some things on top of my desk. I found a pretty green box I had sitting in my closet to help me keep everything together and looking clean.


I love the that the folders are so colorful and pretty.. it makes me happy.
The next day it was time for me to organize some things on top of my desk. I found a pretty green box I had sitting in my closet to help me keep everything together and looking clean.

In there I keep a binder for all my 'inspiration' findings. I read a lot of magazines, but hate when they start to pile up around the house. So after I'm done reading it, I usually clip out what I want to keep and stick them in this tabbed binder under their rightful category... holidays, home decor, recipes, etc. After I try a recipe in here, I will either write in on a recipe card and stick it in my recipe box if it's good, or toss it.


I also keep a greeting card organizer (the cover was ugly, so I made a new one). It has each month in it to write down birthdays, anniversaries, etc, and little pockets to store random thank you cards and other greeting cards. Then I have a small notebook to keep track of monthly bills, as well as my address book.


And that's about it for this part. Two days of working on this project and it's coming along quite well!! It's already making me feel better. Oh yeah.. I also keep my little grocery list/weekly menu pinned up there for easy access!! :)

How does everyone else organize their office space? I'd love to know!
Project: Command Center Organization, Pt. 1
2.24.2011
As I said in my previous post, my first organization project was going to be to get all of my paper things in order. It's something I think I should have done a long time ago, but now with baby coming I think it's even more important to get our things in order.
Are you ready for this? It's pretty bad. Actually, it's not that bad... because it's been worse. Sad, but true. Anyway, our little office space needed some serious lovin'. Things tend to just get thrown on the desk, and it gets a little worse every day. And that plastic tote? Who knows what was in there.. random papers.. pay stubs from 2006............. receipts of clothes purchases from when I was a senior in high school..


The first thing I did was go through the mounds of papers we had built up. I went through and decided what we needed to file and what we needed to shred. This Consumer Reports website might help you decide when it's okay to toss your documents. Then I split the papers up into different categories, so I knew where to place them in my hanging file folders. At this point I have 10 folders.
Auto/Renters Insurance - Personal Property Insurance - Automobiles - Medical/Dental - Banking - Credit - Manuals - Warrenties - Military/Housing (for my husbands work papers) - Dental Assisting (my resumes, continuing education, etc)
Now when we get mail, or important documents, I either file them or shred them right away. Speaking of shredding... this is my lovely 'to shred' pile.. (it felt good to get all that junk out of our home!)..

That kept me busy for most of one night. This is definitely a project I can't complete in one day - I would get too overwhelmed! But it's a start. I can't wait to show you what my desk space looks like after I'm done. :)
Project: Organization Before Baby Arrival
2.21.2011
I have this crazy idea in my head that I need to have everything organized and perfect before our baby arrives in 4 months. A nice idea, but not much of a feasible one for me. But I will try. There are just so many things I want to get done. I tend to get all these different ideas in my head and then instead of taking the time to do one before I start another, I just try to do them all at once. Do you know how well that works out? It doesn't. I usually end up scatter-brained and with a big mess on my hands when I could have had more things done if I would have just taken it one thing at a time.
For instance-- I will start a crochet project, and then in the middle of it I will see another super cute crochet project that I just can't wait to do. So I stop the other one, and start the new one. Then I think.. man, I really want to sew something. So I start sewing some placemats and napkins. Then in the middle of that, I get up to go to the bathroom. On the way out of the bathroom I pass the laundry room and think how bad I need to organize it. So I start organizing that. See? I end up with multiple unfinished projects really fast. It's horrible... a very bad habit of mine.
Because I'm a tad blog-obsessed, I've found a few blogs that deal with organization. So I've taken ideas from each of them and kind of mashed them together. From here on out, I'm going to try to take one thing at a time... we'll see how that goes..
My first organization project is an important one, I believe. Getting all of our papers organized. You know-- legal documents, financial papers, receipts, coupons, etc.. and figuring out a good way to easily maintain it throughout the year. Check back to see how our mess gets cleaned up!
Jewelry Organization... it's about time.
2.12.2011
I'm slowly, but surely, redecorating our bedroom. There are a ton of things I want to do around the house, but I find it most important to start with the bedroom. It's my favorite room. It's our space. It should be beautiful and relaxing - and it's well on it's way!
One of the things on my list was to organize my jewelry! We have a beautiful bedroom set and all of my jewelry and things were just scattered across my long dresser. Something had to be done.

That was just part of it. It was pretty much a nightmare every time I wanted to find something. I needed a simple way to organize my jewelry. So this is what I came up with...


I bought three little wooden boxes at a local store for about $2. They had some super weird designs on them, so I painted over it with some acrylic paints so they match the rest of our bedroom - blues, tans, whites, and accents of yellow. They work perfectly. The top one holds my rings, the middle one holds bracelets, and the bottom one holds stud earrings and other miscellaneous things.
And then there were the necklaces. Oh, the necklaces! For these, I took two wooden frames and spray painted them white. Then I bought some screw hooks and, with the help of my lovely husband, screwed them into the top of the frame. Ta-da! It doubles as some pretty neat "wall art", as well. I made two of those for my necklaces.

Then I made a small one for all my fancy dangling earrings, which I don't own too many of. So the small one was just perfect. I strung two pieces of twine across the frame and my husband nailed them in for me.

And now I have a pretty cute little jewelry corner! I might do a couple things to spruce up the frames, but I'm not sure yet. I'll keep you posted.
Next up I'm re-working a lamp for my bedside table. Things are coming along in our bedroom and I'm getting pretty excited about it!
DIY Pretty Dry Erase Board
1.17.2011
I have seen this idea on quite a few different websites (here, here, here, and here). It's fairly inexpensive and it can also double as wall art when you're not using it as a dry erase board. Bonus! This took me all of about 10 minutes to do.
Materials
1. Glass picture frame. You can find one at a thrift store for next to nothing, or find something you really like at the store. I bought mine for $2.50 at the BX here on base. If you don't like the color of the frame, always remember you can spray paint it and fix it up. :)
2. Fabric of your choice. This is the fun part... so many options. Be sure to wash, dry, and iron your fabric before you use it. You don't want a wrinkled dry erase board!
3. Duct tape. Or any heavy duty tape.
4. Dry erase markers. I've found black to be the best choice of color.
How-To
1. Remove the backing from the frame.
2. Cut a piece of fabric slightly larger than your frame, leave about an inch or so all the way around.
3. Place cut fabric over frame backing and then flip over.
4. Fold over excess fabric and use the heavy duty tape to attach the fabric to your backing.
5. Place the now fabric-covered frame backing into the frame... done! You can now write all over your beautiful, new dry erase board. The markers wipe off of the glass easier than on store bought dry erase boards, imo.


If you decide to make one, leave a link in the comments to a picture of it. I love to see how other people's turns out too. :)
Materials
1. Glass picture frame. You can find one at a thrift store for next to nothing, or find something you really like at the store. I bought mine for $2.50 at the BX here on base. If you don't like the color of the frame, always remember you can spray paint it and fix it up. :)
2. Fabric of your choice. This is the fun part... so many options. Be sure to wash, dry, and iron your fabric before you use it. You don't want a wrinkled dry erase board!
3. Duct tape. Or any heavy duty tape.
4. Dry erase markers. I've found black to be the best choice of color.
How-To
1. Remove the backing from the frame.
2. Cut a piece of fabric slightly larger than your frame, leave about an inch or so all the way around.
3. Place cut fabric over frame backing and then flip over.
4. Fold over excess fabric and use the heavy duty tape to attach the fabric to your backing.
5. Place the now fabric-covered frame backing into the frame... done! You can now write all over your beautiful, new dry erase board. The markers wipe off of the glass easier than on store bought dry erase boards, imo.


 |
| As of right now, our bedroom is greens, teals, & browns. So I chose this beautiful green fabric. I have a few more DIY projects for our bedroom that I'd like to do.. |
 | |||
| You can use it as a to-do list. |
 |
| Leave a message on it for your hunny.. :) |
 |
| Hang it on the wall and write your favorite Bible verse, quote, or saying.. |
If you decide to make one, leave a link in the comments to a picture of it. I love to see how other people's turns out too. :)
Subscribe to:
Posts (Atom)