Stitch Fix #2

3.08.2014

First, I feel I need to do a little recap of how Stitch Fix works.

  • All you do is head over to their website and fill out a style profile and make any extra notes as needed, and pay a $20 styling fee.  
  • A stylist will pick out 5 pieces for you.. clothing, accessories, etc.  I tell them I don't want accessories, that I only prefer clothing.  But that's just my preference.
  • When your box arrives, take a peek at the styling suggestions and try it all on!
  • Within 3 days you need to log on to your account and tell them what you liked & what you didn't.  Then you can pay for what you keep and drop everything else back into the mail (they send you a prepaid bag for returns.. no hassle or extra $$$!)
  • The $20 styling fee goes towards whatever you decide to keep!  Cool, right?

I'm like a kid on Christmas whenever my Stitch Fix arrives at my door step!  This time I requested more spring/summer items, since the cold weather is close to being over.  I didn't want to spend any more money on warm clothes.  My stylist did a rockin' job at catering to my requests!  She even took a look at my Style & Fashion Pinterest Board (I provided my link to them when I ordered my box).  

I love that the stylist writes you a little note, and they stick in styling suggestions for each piece.  It really helps when trying to get an idea of how you would wear that item.  Admittedly, I need a little help in that department.. One reason why I love Stitch Fix.  The other reason being they help me try something a little different and out of my "box"!


Now, here's what I received...

1  ::  Antioch Lurex Detailed Striped Sweater by Mystree

I really liked this sweater!  It's a lighter weight, so I could wear it well into spring (on those more chilly nights).  It's a navy blue and gold-ish color, and the design of it is just my style.  And it's very comfy & cozy.  Keeper!

stitch fix

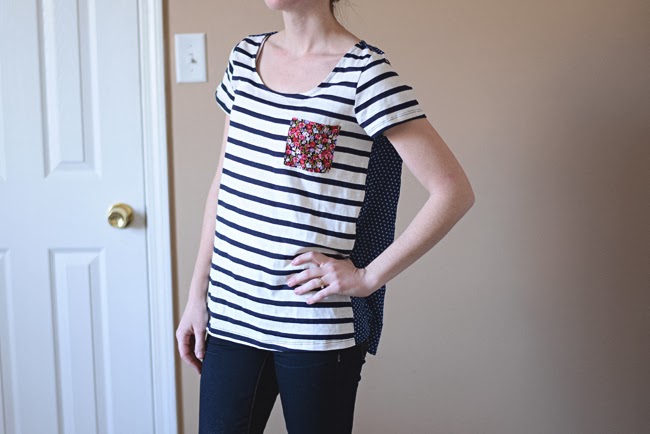
2 ::  Ritz Mixed Pattern Front Pocket Knit Shirt by Ezra

When I first opened the box and looked at the clothes (before trying them on), I really liked this one.  It was unique and fun, and I liked how the front & back were different.  And the little floral pocket on the front was a cute detail.  However, when I got it on it wasn't very flattering to me.  It was very "boxy" and just kind of hung off of me.  I wasn't impressed with the cut... so this one was a no-go.
stitch fix

stitch fix

3  ::  Wilfred Abstract Print Tank by Renee C

I adore the bright colors of this tank top.  And the fact that it was airy and would be nice and cool for summer.  But the first thing I thought when I put it on was... I look pregnant.  That's not how you want to look when you're not pregnant.  Haha.  Needless to say, this one also got sent back!

stitch fix

4  ::  Wisteria Weave Detail Knit Tank by Mystree

This tank top is so comfortable!  I really like the neckline, and also the detail of the pleats in the front.  It's a pretty light gray color that would look great with some dark bermuda short (or American Eagle's midi shorts.. I love those).  Keeper!

stitch fix

5  ::  Tiburon Floral Print Tank by Fun2Fun

My first thought of this tank top when I saw it in the box, was that it was kind of old lady-ish.  But when I got it on, I actually really liked it.  The colors are very pretty, and it would pair nice with some white shorts in the summertime.  This is also a keeper!

stitch fix

stitch fix

This has been my most 'successful' Stitch Fix box yet.  My stylist did an awesome job.  I'm already looking forward to getting another box.  What did you think of these picks?

If you want to order yourself a Stitch Fix box, go ahead and do that HERE (referral link).  It's a pretty fun experience!  And if you do, let me know how you liked it (or leave your link in the comments if you blogged about it!). 

Check out my Stitch Fix #1

Project Life; Week 3

3.04.2014

So here it is, my week 3 of Project Life.  I'm a little behind, but I went into this knowing I would always be a little bit behind - and I'm fine with that.  My wonderful husband built me a desk, and that definitely makes my scrapbooking time a little more productive since I now have everything in one place. 


And here are close-ups of some of my favorite ones;


My title card is a bit eclectic this time, though I must say I'm really diggin' watercolors.  They're super fun to play around with.  I have this set that I bought from Michael's.  Lots of fun colors, and the price is awesome ($5, I think?  And if you have a coupon.. even better!).


For the most part I just kept things simple for this layout, and kind of let the photos stand out for themselves.  My favorite is definitely the one of Clara dancing on the couch.  Makes my heart melt every time I look at it.  I just love that kid.

Oatmeal Cream Pies {recipe}

3.01.2014


I've been wanting to try to make these oatmeal cream pies for a long while.. and I decided to make them this past week to take to work.  They were gone by the time I left, so I think they were a hit.  ;)  I did save some for us to keep at home too, and of course those didn't last long either.  They taste very similar to the well-known store bought version.. even better, actually.. because homemade is always better.  Don't let the ingredient list scare you.  These cookies aren't that much work, and they're worth it!  When I first saw the ingredient list, I thought how strange that cocoa powder and dried apples were in it.. but they looked so good, so I stuck it out.. and I don't know how, but everything just meshes so well together.  I have to eat mine with a big glass of milk.  :)

Oatmeal Cream Pies
recipe from Annie's Eats

For the cookies: 
8 oz. (1½ cups plus 2 tbsp.) all-purpose flour
4 oz. (1¼ cups) old-fashioned oats
½ ounce (2 tbsp.) unsweetened cocoa powder
2 oz. (1 cup, packed) dried apple rings
3 oz. (6 tbsp.) unsalted butter, at room temperature
2¼ oz. (¼ cup plus 1½ tsp.) canola oil
7 oz. (1¾ cup plus 2 tbsp.) sugar
1½ oz. (3 tbsp.) molasses
3 oz. (6 tbsp.) corn syrup
1½ tsp. baking soda
½ tsp. baking powder
½ tsp. kosher salt
¼ tsp. ground ginger
¼ tsp. ground cinnamon
1 large egg
2 ounces (¼ cup) milk

For the filling:
2 cups marshmallow creme
4 oz. (8 tbsp.) unsalted butter, at room temperature
¾ cup confectioners’ sugar, sifted
Pinch of salt
½ tsp. cream or milk

Preheat oven to 350 F.  Line baking sheets with parchment paper or a silicone mat.  Combine the flour, oats, cocoa powder, and apples in a food processor (I used my Ninja) and pulse a few times, then process about 2 minutes, until no large apple bits or full oats remain.  Set aside.

Combine the butter, oil, sugar, molasses, corn syrup, baking powder, baking soda, salt, and spices in a bowl of a mixer.  Beat on medium-high speed until well combined, about 2 minutes.  Mix in the egg and beat 1 more minute.  Blend in the dry ingredients and the milk just until incorporated.  Scrape down the sides of the bowl and beat 30 seconds more.

Use a dough scoop to portion out the dough onto the prepared baking sheets, about 1 tablespoon per cookie, leaving ample room as the cookies will spread while baking.  Transfer the pans to the oven and bake, rotating halfway through, until the cookies are set around the edges and puffed up in the center, about 4-6 minutes depending on your oven.  They may seem too soft but remember that the original is a very soft cookie so that is the desired texture here.  Also remember the cookies will continue to bake a bit longer once they are out of the oven.  Do not overbake, this will result in a hard cookie instead of a soft and chewy one.  When cool and set enough to move, transfer to a wire rack to cool completely.

For the filling, combine the marshmallow creme and butter in a mixing bowl and beat on medium-high speed until smooth.  Blend in the confectioners’ sugar and salt and whip until the mixture is light and fluffy, about 1-2 minutes more.

Pair up the cookies by size.  Then transfer the filling mixture to a pastry bag fitted with a medium round tip.   Or you can do what I did and just use a spoon to dollop some in the center of the flat side of the cookie, then sandwich together with the other cookie and press gently so the filling goes to the edges.  Store in an airtight container.  Yields 2-3 dozen cookies, depending on size.


Parson Tower Desk // Craft Room

2.26.2014

We've been doing some house redecorating the past few weeks - one of the things we've done is started redoing the guest room/craft room.  I sold my old desk so my husband could create a bigger desk for me... I needed something with a lot of space on top for doing my Project Life.  I sat down and went through plan after plan, and eventually ended up choosing to go with the Parson Tower Desk from Ana White.  He actually finished it for me the night before Valentine's (while I was sleeping.. he was up until 2am!) so it would be in the garage when I went to work the next morning.. it has my favorite chocolate candy on it.. and flowers... so sweet.  :)


I was so excited to get stain picked out and get it finished.  I decided to stain rather than paint, because I did not want to paint it white and I thought I would get tired of a color fast... so I stuck with something a little more classic and timeless.  Stain it was.. and I knew I wanted it dark!  So we went to Home Depot and picked out a few samples to test.


I know these stains look so similar.  But two of them had a little bit of an orange tint than the other.  I ended up using Mixwax 'Jacobean'... it was the most solid brown of the three and it gave a really nice, rich color.


This last photo was taken with my phone, but you get the gist of the finished product.  I'm absolutely in love with the desk.  It's nice and long, which give lots of room for all of my projects.  I bought two wire baskets for the shelves at Home Goods, and then I hung up those clip board with sticky tack.. for now.. until I decide if I want that to be more permanent.  Excuse the mess of the photo.. I know it's not too much to look at right now, but I'm going to be updating you with progress photos as I get shelving, etc, up on that wall.. and get the rest of the room decorated.  It's not only my craft area, but also the guest area (my parents are coming to visit next month!).


I can't wait to get going on the rest of it.. the desk was the 'big' project.. now it's all just starting to come together.  :)

Love Healthy Me

2.20.2014

I wrote this blog post as part of a movement by Weight Watchers to encourage people to remember that loving yourself starts with taking care of your health everyday. Though I was compensated for my time and commitment, all views, positive and negative, are my own.

At the beginning of this year, I made some "resolutions".. some goals, which I think is good for anyone to have - which included making more time for myself, and keeping myself healthy.  I think it's so important to take care of yourself, and love yourself.. not only for you, but also so you can love those around you better.  

Since I've been working full time again, I've been making a point to get to bed before 10pm (though it's not like you have to twist my arm, I can't keep my eyes open that late for the life of me)... it's so crucial for me to get a good 7-8 hours of sleep at night.  I can tell the difference in how I feel and how I act when I don't get as much rest as my body needs.  And I also don't get as much 'me time' as I once used too.  I really try to give myself 10-15 minutes to do something just for me, something I want to do, or just relax.. like catch up on a TV show, a book, or even a bath in silence.  Whatever it is like you like to do for yourself (paint you nails, flip through a magazine, just sit with your feet propped up and rest your eyes?), I suggest you try to do it often.. you really will feel better.

Being more active is another thing I wanted to do.. though I don't find that difficult when I have a 2.5 year old daughter and a 3 month old puppy.  Even 20 minutes of outside play gets me tired!  :)

weight watchers, simple start, #lovehealthyme

weight watchers, simple start, #lovehealthyme

And because being 'good' all the time isn't fun... you gotta be a little bad.. treat yourself to something nice!   And for me, that would be some thing sweet... and chocolate.. my weakness.  Really though.. go ahead.  You deserve it.


weight watchers, simple start, #lovehealthyme

I've been doing these things consistently, and can already tell the difference in how I feel about myself, and how I act and feel mentally.  

Also, Weight Watchers has a new app out called Simple Start... it's free, and I suggest you check it out!

Getting Through That Rough Week

2.18.2014

This is a sponsored post for U by Kotex, who provided me products to review. You can get a free sample from U by Kotex too at http://bit.ly/107R90y and Do the Demo.


Serious talk here.. any other girl dread "that time of the month"? All of you? Well then we're on the same page here. But there are a few things that do make that 5(ish) days more bearable... not only for me, but for those who have to be around me (haha).


U by Kotex Tampons; I like to know that I always have the best protection, which is why I only use U by Kotex! U by Kotex Panty Liners; for the extra confidence to know that I'm good to go. A cozy blanket & heating pad that I can curl up in bed or on the couch with while reading a good book. And I can't forget the 800mg of Ibuprofen that's awesome enough to knock any of the discomfort out in like 5 minutes. They're basically my saving grace. And after that, some good girly 'me' time... relaxing candles, chocolate, and good ol' mani/pedi. Maybe even a nice facial mask for the pesky little breakouts I tend to get around that time. And these are the things I can.not.survive.without during 'that time of the month'.


What makes you feel better during that time of the month? For next time, why not request a free sample for a U by Kotex product!

I wrote this review while participating in a content series through Crowdtap on behalf of U by Kotex, and received products to facilitate my post and compensation for my time to participate.