Coleman has been gone for 83 days... and it's been 83 days too long! I suppose I should be counting my blessings, because at least I don't have to be away from him for a full year like it was originally planned. But that definitely doesn't make the present any easier. I'm hoping to be in Korea with him before August. I'm medically cleared and he already has an apartment waiting for us - which, by the way, I am SO excited to move into! Now we're just waiting on the ammendments so he can set up things with TMO and get my plane ticket. I'm praying he gets them this week. Please, oh please!
So I came across this list on the internet, and I've added some of my own.. but I thought it was a very good list. Deployments and unaccompanied overseas tours are a sensitive subject for a lot of military spouses (not just me!). Some of these things have been said to me, some of them haven't... if you've said one of these things to a military spouse, don't feel bad - just don't say it again. And while my husband is not in Iraq or Afghanistan right now (which I am so thankful for).. he is still overseas, he is still very far away from me, and it is still hard.
Things NOT to say to a Military Wife (or spouse)
1.) "That's horrible... I'm so sorry."
He's doing his job, and he's doing it without a complaint. So take a moment out of your comfortable lives to be appreciative, and don't be sorry.
2.) "Well, he signed up for it, so it's his own fault for whatever happens over there."
Yes, ignorant, he did sign up. And every day he preserves your right to make stupid comments like that.
3.) "Well, in my opinion..."
Well, you can just stop right there because I didn't ask for your personal political opinion. And right about now, I probably don't care.
4.) "Wow.. you must miss him, huh?"
DUH. I don't have any other words for this one.
5.) "My husband had to go to [wherever] for business once for three weeks. I totally know what you're going through."
No, no you don't. I do not feel bonded to you in the slightest because of this comment. Do not compare your husbands measly business trip to a 6-12 month (or more) overseas tour or deployment.
6.) "Don't you miss sex? I couldn't do it!"
No.. not at all. I'm a robot. Seriously, military spouses (as should ANY other spouse) learn quickly that our relationships must be founded on something greater than sex. We appreciate the important things.. like simply hearing their voices, seeing their faces, being able to have dinner together every night. And the sad truth is, most relationships wouldn't be able to withstand 12 months without sex.
7.) “This deployment shouldn’t be so bad, now that you’re used to it.” or "Get used to it, you're a military wife."
Yes, we learn coping skills. We have to figure out ways to make life run smoothly and for time to go by faster. But it will never get "easy". If you only knew.
8.) “What are you going to do to keep yourself busy while he’s gone?”
Short answer: Try to stay sane.
9.) “How much longer does he have until he can get out?”
This one is annoying whether my husband is overseas or not. Many of our husbands aren't counting down the days until they can "get out". Many of them keep signing back up because they actually love what they do. And it's their JOB or CAREER. Is YOUR husband going to quit his job?
10.) “I don’t know how you manage. I don’t think I could do it.”
This may be the one that I've heard the most. Although I think this is intended to be a compliment, it's still annoying. Here's why: it's not like all of us military wives have been dreaming of the day where we'd become extremely anxious, carrying our cell phones to the bathroom and into the shower.. to make sure we don't miss a call. Or to try to make sure we're home at the right time so we can skype with our husbands. We're not made of some mysterious matter that makes us more capable, we do it because we have to. I'm proud of my husband, and he's worth it.
A thank you, a prayer, a word of encouragement, or even a smile is good enough.

Cherry Turnovers
6.25.2010
I had some leftover cherry pie filling from when I made those cheesecakes on Father's Day, so guess what I made? Cherry turnovers.. requested by my dad. I know some people eat these things for breakfast, but they're more of a snack or dessert to me. So easy to make... are you ready?
Ingredients:


Unroll the dough and separate them into 8 triangles. Now you're going to make 4 squares; take 2 triangles and press the seams together to make into a square. Spoon about 1/4 cup of pie filling into about the middle of each square. Fold to make triangles and pinch together to seal the edges - we don't want the filling to leak out! Place them on an ungreased baking sheet and bake at 375 F for about 10 - 15 minutes, or until the edges are golden brown. For the glaze, mix the powdered sugar and milk together, then drizzle over the turnovers. You can even add a little vanilla.. or cinnamon.. to make the glaze a little more exciting. Easy, right? I told you! Serve them while they're still warm! Makes 4 cherry turnovers.
You can use whatever filling you wish, of course. Blueberry, cherry, strawberry, sauteed apples, peach, chocolate... mmmm. Endless possibilities!

Ingredients:
- 1 (8 oz) package of refrigerated crescent rolls
- 1 cup cherry pie filling (a small can)
- 1/2 cup confectioners sugar
- 1 tablespoon milk


Unroll the dough and separate them into 8 triangles. Now you're going to make 4 squares; take 2 triangles and press the seams together to make into a square. Spoon about 1/4 cup of pie filling into about the middle of each square. Fold to make triangles and pinch together to seal the edges - we don't want the filling to leak out! Place them on an ungreased baking sheet and bake at 375 F for about 10 - 15 minutes, or until the edges are golden brown. For the glaze, mix the powdered sugar and milk together, then drizzle over the turnovers. You can even add a little vanilla.. or cinnamon.. to make the glaze a little more exciting. Easy, right? I told you! Serve them while they're still warm! Makes 4 cherry turnovers.
You can use whatever filling you wish, of course. Blueberry, cherry, strawberry, sauteed apples, peach, chocolate... mmmm. Endless possibilities!

Mini Cheesecakes with Vanilla Wafer Crust
6.23.2010
I made these for Father's Day this past Sunday... this is definitely the BEST thing I've made yet, imo! Yes, even better than those cake balls I made a while back. I have to say, I'm pretty darn proud of myself for this one. I've never made cheesecake before so I wasn't sure how they would turn out, but they turned out amazing! These would be good for just about anything - pot lucks, wedding or baby showers, parties, or just because. They're great because they're already in single servings and the fun part is that you can top them with whatever you want! And I'm pretty certain that the crust is my favorite part.. I almost forgot how good vanilla wafers were!
Alright, let's do this... preheat your oven to 375 degrees.
 Now, the crust:

Mix together, and press in each cupcake liner to make a small crust for your cheesecakes! Bake them at 375 for about 7 or 8 minutes. This would be great for a full sized crust for your favorite pie, too!
 Cheesecake:
You can be creative and top them with whatever you want: chocolate, caramel, turtle topping, cherry, blueberry, sweetened whip cream and strawberries, canned pie filling, fresh fruit... totally your choice. I did half of mine with cherry pie filling and the other half with chocolate ganache and strawberries. MMM!


Alright, let's do this... preheat your oven to 375 degrees.

- Foil cupcake liners
- 1 1/2 cups crushed vanilla wafers (it would be fun for kids to help out with this part, put in a ziplock bag and roll over with a rolling pin)
- 1/3 cup sugar
- 6 tablespoons butter
- 1/2 teaspoon cinnamon (just for fun!)

Mix together, and press in each cupcake liner to make a small crust for your cheesecakes! Bake them at 375 for about 7 or 8 minutes. This would be great for a full sized crust for your favorite pie, too!

- 2 packages (8 oz) cream cheese, softened to room temperature
- 3 eggs
- 3/4 cup sugar
- 1/2 tablespoon lemon juice
- 1 tablespoon vanilla
You can be creative and top them with whatever you want: chocolate, caramel, turtle topping, cherry, blueberry, sweetened whip cream and strawberries, canned pie filling, fresh fruit... totally your choice. I did half of mine with cherry pie filling and the other half with chocolate ganache and strawberries. MMM!


Cake Mix Cookies & Ice Cream Sandwiches
6.09.2010
So it's summertime... and what could be better than ice cream sandwiches in the summer? Ok.. bomb pops are pretty good too, but these ice cream sandwiches are just yummy. For these I used cake mix cookies, but you can certainly use a regular cookie if you'd rather. I like the cake mix cookie because they're still soft even after they've been in the freezer.
Cake Mix Cookies


Ok, so this is SUPER simple. Preheat oven to 350 degrees. Combine cake mix, eggs, shortening - note that the dough will be really stiff.. it's suppose to be that way! Then just drop by the spoonful onto a baking sheet and bake for 5-8 minutes. It's okay if they're slightly underdone, it'll make them better after they've been frozen. :) Also, just let them cool on the baking sheet because they'll be so soft that they'll just crumble if you try to put them on a wire rack or something. Once they've cooled, put some ice cream inbetween the cookies and place them in the freezer right away. How easy and fast is that?
The fun thing about this is that you can use whatever flavor cake mix you want and whatever flavor ice cream you want - get creative with it! OH - and something I also want to try are red velvet cookies (me and red velvet.. let me tell ya..) Just make these cookies with red velvet cake mix and for the filling, you can use ice cream.. BUT you can also do 1 cup butter, 1 cup marshmallow fluff, and 1 cup powdered sugar. Mix those ingredients and put between red velvet cookies.. oh my goodnessss... :)
ENJOY!
Cake Mix Cookies
- cake mix of your choice (I just used a regular chocolate cake mix)
- 1/2 cup shortening (you can use oil instead, if you want.. but they turned out great with shortening!)
- 2 eggs


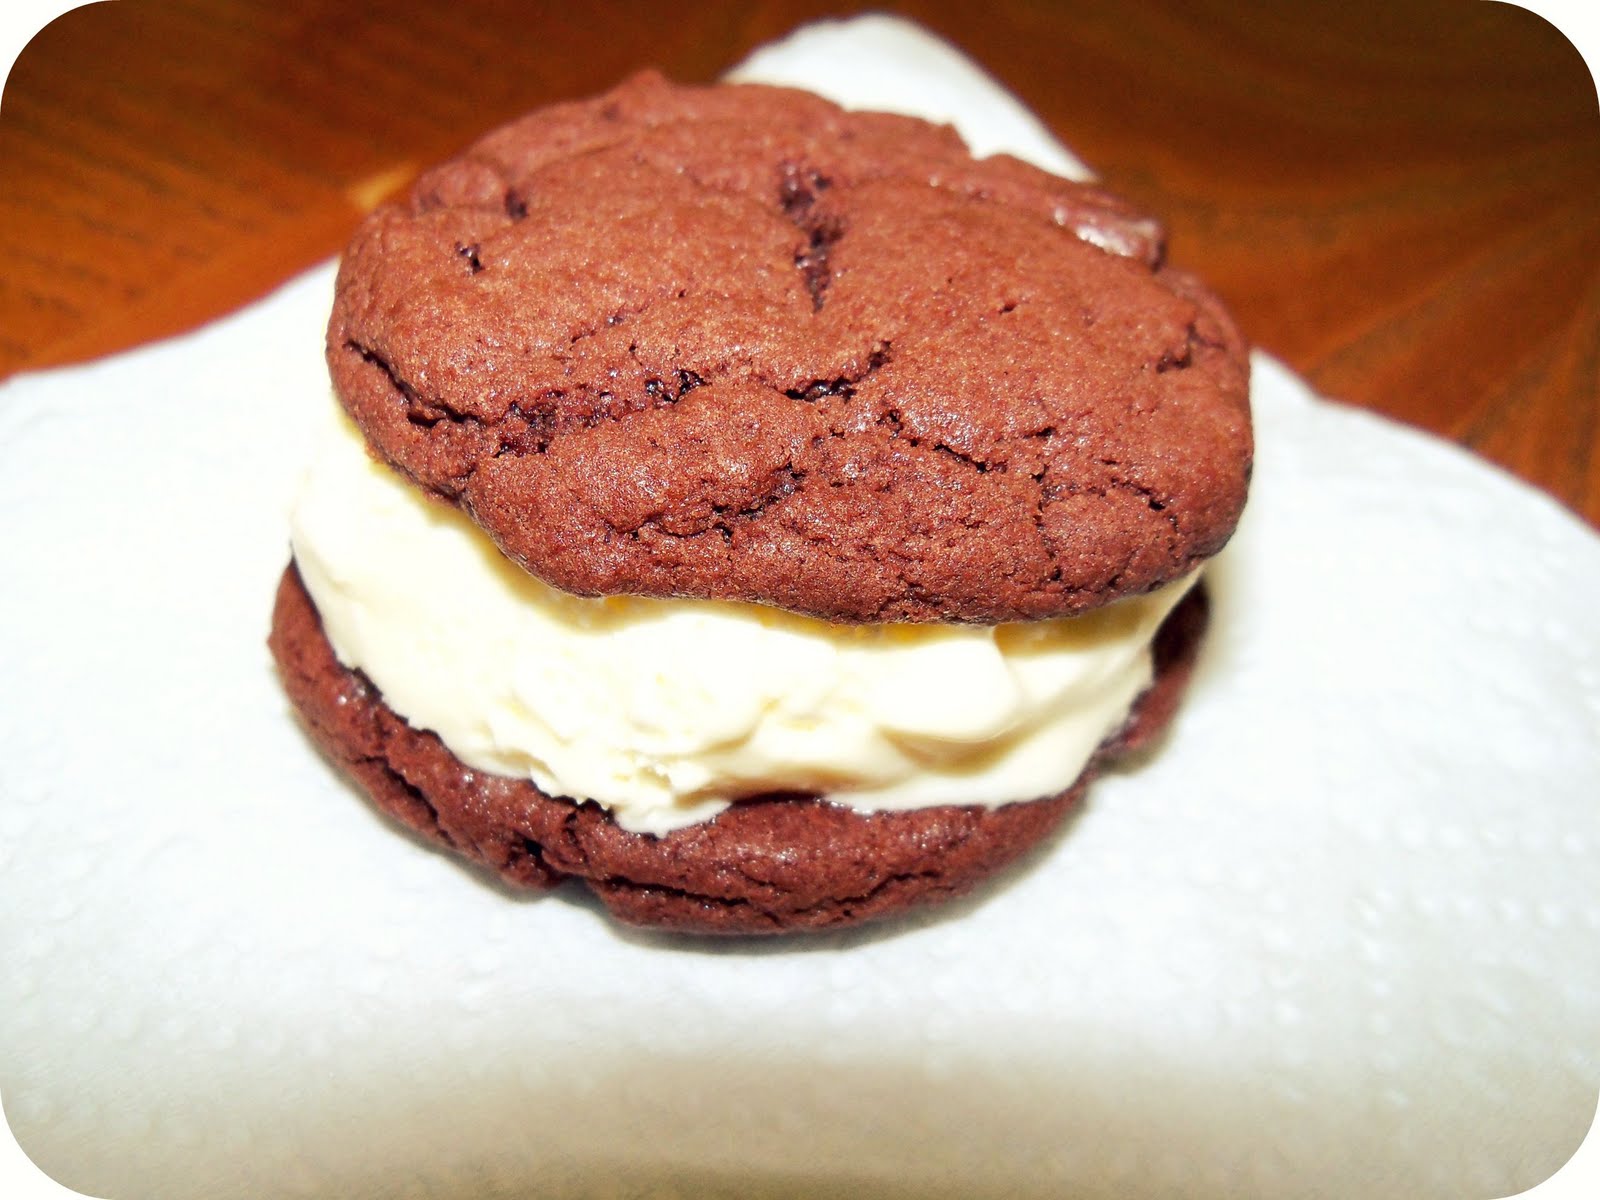
The fun thing about this is that you can use whatever flavor cake mix you want and whatever flavor ice cream you want - get creative with it! OH - and something I also want to try are red velvet cookies (me and red velvet.. let me tell ya..) Just make these cookies with red velvet cake mix and for the filling, you can use ice cream.. BUT you can also do 1 cup butter, 1 cup marshmallow fluff, and 1 cup powdered sugar. Mix those ingredients and put between red velvet cookies.. oh my goodnessss... :)
ENJOY!
Fruit Salsa w/ Cinnamon Chips
5.31.2010
First of all, Happy Memorial Day!
 Please take time today to remember all of the heroes who fight for our safety and freedom - the ones who have made the ultimate sacrifice as well as the ones who are still fighting for us today. It's a day to honor and celebrate all of those who help keep this country such a great place to call home! I want to give a big THANK YOU to all of those who serve, as well as the families behind them who serve also.
 My family and I went to the Memorial Day parade today.. it was fun! I still get excited when the fire trucks go by.. haha. I think it's important to also recognize those who serve us locally.. such as policemen, EMTs & paramedics, and firefighters. My big brother has been on the volunteer fire department for... a long time.. so thank you big bro! :) After the parade we went up to the cemetery to visit our loved ones. One of them being my Grampa (above picture), who served in the Army. I love and miss you, Grampa! I wish my sweet husband was here with me today (pictured right).. or rather, me there with him! I may get to move there with him.. I don't know any details yet, but I'll write when I do. :) He is stationed in Korea with the Air Force for the next year.. I am SO proud of him. You're a hard worker and a loving husband.. I am BLESSED to have you in my life! Thanks for all you do, babe!
Okay, okay.. so it's a beautiful day out today - actually, the whole weekend has been extremely beautiful! And you know what I love most in the summertime? Fruit. So refreshing! I love ALL fruit.. kiwis, mangos, grapes, berries.. well, actually I don't like all fruit. I hate melon. I think it is absolutely disgusting. But I'm weird like that. :) So today our family grilled out and I made some fruit salsa and cinnamon chips. Let me tell you, you're going to want to make this over and over. What a great snack - and healthy too!
 First, choose what fruit you want to use. I like to use something of every color - I like when it's colorful! I chose to use pineapple, blueberries, strawberries, kiwi, and mango. Fruit can be expensive sometimes.. so just use whatever you want. Whatever fruit sounds best to you, or whatever is on sale. Cut up the fruit in small pieces and mix them together. Remember, it's a salsa.. you're going to be eating it with a chip, so you want them small. Also, if you're using blueberries or blackberries or something of the sort, stir them in last so they don't stain the rest of the salsa.
Next, you're going to want to sweeten the salsa a little bit. I chose to use some honey and sugar. You can use other things such as brown sugar or powdered sugar if you want. But I love the honey, it adds a great taste to the fruit. You can add a little lime juice, too. Just be careful not to add too much because the fruit will already make the salsa juicy. Look at how pretty and colorful that is!!! Love it.

Chill the salsa for a little bit (definitely tastes better that way), then it's time to make the cinnamon chips! Or if you'd rather just eat it over some vanilla ice cream, that's perfectly fine and delicious, too.
Okay, now onto the cinnamon chips!
The only things you need for these are flour tortilla (I used the 6" ones), melted butter, and cinnamon sugar. 3 ingredients - SO EASY. Preheat the oven to 350 degrees. Brush one side of the tortillas with melted butter, then sprinkle on some cinnamon sugar - however much your heart desires! When I make my cinnamon sugar, I like to use 1/4 cup sugar and 1 tbsp cinnamon. Use a pizza cutter to cut the tortillas into wedges and then bake them on an ungreased cookie sheet for about 10 minutes, or until the edges start to curl up.


They'll be light and crispy when they're done.. they make a great snack.. or a dessert. Load them up with vanilla ice cream, hot fudge, or caramel sauce.. YUM. But they also go perfectly with the fruit dip! I think everyone needs to try making these.. so fast & simple & delicious!

 Please take time today to remember all of the heroes who fight for our safety and freedom - the ones who have made the ultimate sacrifice as well as the ones who are still fighting for us today. It's a day to honor and celebrate all of those who help keep this country such a great place to call home! I want to give a big THANK YOU to all of those who serve, as well as the families behind them who serve also.
Okay, okay.. so it's a beautiful day out today - actually, the whole weekend has been extremely beautiful! And you know what I love most in the summertime? Fruit. So refreshing! I love ALL fruit.. kiwis, mangos, grapes, berries.. well, actually I don't like all fruit. I hate melon. I think it is absolutely disgusting. But I'm weird like that. :) So today our family grilled out and I made some fruit salsa and cinnamon chips. Let me tell you, you're going to want to make this over and over. What a great snack - and healthy too!
 First, choose what fruit you want to use. I like to use something of every color - I like when it's colorful! I chose to use pineapple, blueberries, strawberries, kiwi, and mango. Fruit can be expensive sometimes.. so just use whatever you want. Whatever fruit sounds best to you, or whatever is on sale. Cut up the fruit in small pieces and mix them together. Remember, it's a salsa.. you're going to be eating it with a chip, so you want them small. Also, if you're using blueberries or blackberries or something of the sort, stir them in last so they don't stain the rest of the salsa.
Next, you're going to want to sweeten the salsa a little bit. I chose to use some honey and sugar. You can use other things such as brown sugar or powdered sugar if you want. But I love the honey, it adds a great taste to the fruit. You can add a little lime juice, too. Just be careful not to add too much because the fruit will already make the salsa juicy. Look at how pretty and colorful that is!!! Love it.

Chill the salsa for a little bit (definitely tastes better that way), then it's time to make the cinnamon chips! Or if you'd rather just eat it over some vanilla ice cream, that's perfectly fine and delicious, too.
Okay, now onto the cinnamon chips!
The only things you need for these are flour tortilla (I used the 6" ones), melted butter, and cinnamon sugar. 3 ingredients - SO EASY. Preheat the oven to 350 degrees. Brush one side of the tortillas with melted butter, then sprinkle on some cinnamon sugar - however much your heart desires! When I make my cinnamon sugar, I like to use 1/4 cup sugar and 1 tbsp cinnamon. Use a pizza cutter to cut the tortillas into wedges and then bake them on an ungreased cookie sheet for about 10 minutes, or until the edges start to curl up.


They'll be light and crispy when they're done.. they make a great snack.. or a dessert. Load them up with vanilla ice cream, hot fudge, or caramel sauce.. YUM. But they also go perfectly with the fruit dip! I think everyone needs to try making these.. so fast & simple & delicious!

(thanks to Pitman Photography for Coleman's photo)
Sweet Potato Fries
5.20.2010
 Last night I made some sweet potato fries to go along with dinner - yum! Sweet potatoes are one of my favorite things, so tasty. The recipe I used came from Sugarlaws. This recipe only serves 2, so I doubled it when I made it.
You will need:
- 2 large sweet potatoes
- 1 (generous) teaspoon of salt
- 1 (generous) teaspoon garlic powder
- 1/4 teaspoon paprika
- 3 tablespoons EVOO
- Black pepper (to your liking)
Subscribe to:
Posts (Atom)